How to Fix the SMB Signing not Required Vulnerability

The SMB Protocol uses data encryption for all Windows operating systems for file sharing, printer sharing, and Windows management to prevent the modification of transmitted packets. This feature must be enabled on both the server and client sides. This ensures that client computers without SMB signing enabled cannot communicate with the server. ***Enabling SMB packet signing reduces the performance of file service operations by 15%. Relevant registry setting: HKLM\System\CurrentControlSet\Services\LanManServer\Parameters\RequireSecuritySignature It is possible to protect against this vulnerability by enabling the setting Microsoft network server: Digitally sign communications (always). If you are doing this on a local computer start>run>In Gpedit, under security local security Microsoft network client: Digitally sign communications (always) is enabled If you are doing this with GPO, you can follow the same steps; you can create a group policy instead of gpedit. Additionally, after testing, you can also change the settings of the following policies. Computer Configuration->Policies->Windows Settings->Security Settings->Local Policies->Security Options Disable Microsoft Network Client: Digitally Sign Communications (Always). Disable Microsoft Network Server: Digitally Sign Communications (Always). Enable Microsoft Network Client: Digitally Sign Communications (If Server Agrees). Enable Microsoft Network Server: Digitally Sign Communications (If Client Agrees). If these settings are not enabled for signing on your client and server, you may not be able to access shared folders, so we recommend that you do not try them on real systems without testing.
Important Considerations when Getting Penetration Testing Services

Cyber threats such as data breaches and ransomware attacks can cause businesses to suffer serious financial losses. The most secure way to protect IT infrastructure from such attacks and business-level financial damages is through regular penetration testing processes. So, what should you consider when getting penetration testing services? The ideal answers to this question await you in the rest of our content. What is Penetration Testing? Penetration testing is a controlled attack simulation performed by a cybersecurity expert. The purpose of this simulation is to identify vulnerabilities that malicious individuals might exploit to steal information or take complete control of the system. Penetration tests not only discover vulnerabilities in the IT infrastructure but also reveal how resistant the system is against real attacks. Penetration tests can be performed on an organization’s entire IT infrastructure or focused on specific parts. In this context, simulations can be designed targeting external networks, servers, web and mobile applications, and IoT devices. The results obtained after the simulation are analyzed and compiled into a comprehensive report. The report provides recommendations on what changes can be made to security policies to address existing vulnerabilities. What should be Considered Regarding Penetration Testing Services? When choosing among penetration testing companies, it’s important to consider the following criteria: Certification Certification is the most important criterion to consider when selecting a cybersecurity firm for penetration testing services. Having internationally recognized certificates provides an advantage for the testing company. To verify the service provider’s compliance with legal regulations and quality standards, you can first check if they have TSE approval. Companies with TSE penetration testing authorization certificates conduct IT infrastructure auditing processes in full compliance with ethical and legal responsibilities. References and Experience Level Another aspect as important as certification in choosing a penetration testing firm is references and experience level. The easiest way to learn about a company regarding these two criteria is to examine their previous work. Having service experience in your industry facilitates mutual understanding between both parties in process management and helps develop ideal solutions. While focusing on experience level, the individuals who will perform the penetration test, especially the team manager, can also be evaluated individually. Test Scope Test scope is among the criteria to consider when selecting a penetration testing firm. When determining the penetration test scope, objectives are first defined. The main assets tested during the simulation process are internal and external networks. In addition to networks, penetration protocols can be applied to assets such as payment systems and user databases within the simulation scope. APIs and microservices, IoT devices are other assets that can be tested. After defining the objectives, it’s time to determine which type of test will be applied. In this context, black box testing allows for attack simulation from outside without any system information. Gray box testing provides partial information about specific parts of the system. White box testing thoroughly checks the system with full access, including source codes. It’s important to plan the penetration testing application in a way that won’t disrupt workflow. Confidentiality and other Legal Requirements A non-disclosure agreement must be signed with the service provider before conducting penetration testing. During contract establishment, assurance should be provided especially on two issues. The first is how the obtained data will be used. The second is that the obtained data cannot be shared with third parties. In addition to the confidentiality agreement, permission from the company’s owner or authorized person must be obtained before testing to ensure legal compliance. Otherwise, process-related issues may arise due to unfulfilled legal requirements. Reporting and Result Analysis The penetration testing firm should be able to provide detailed reporting and result analysis. The expected sections in the test report are: Identified vulnerabilities and their technical explanation, Effects of vulnerabilities according to risk classes (high, medium, low), Possible attack scenarios and recommendations for solutions. Recommendations provided to address weaknesses identified through penetration testing should be detailed step by step in the report. After the report presentation, the TSE-approved penetration testing organization makes a presentation about the test findings. During this presentation, questions from company officials are clearly answered to ensure awareness of risks is clarified. Retesting and Verification Penetration testing is a long-term process that requires careful planning of every detail. Therefore, the process doesn’t attempt to identify possible vulnerabilities in the system and its components with just a single test. Penetration testing experts with high industry experience perform retests to ensure that vulnerabilities found during the initial simulation are completely eliminated. Such applications aimed at understanding the extent to which IT infrastructure vulnerabilities have been addressed are called verification tests. Cost Analysis The final consideration when getting penetration testing services is cost analysis. When determining who will perform the test that will reveal your IT infrastructure’s security status, it’s beneficial not to rely solely on the price criterion. By conducting a cost analysis, you can easily determine how the service scope can help reduce your expenses. Comprehensive testing and detailed reporting are particularly necessary to determine the security status of critical systems. Contact our experienced team now to learn about penetration testing and our service scope!
How should a Strong Password Be
Passwords form the first line of defense against unauthorized access to ensure your organization’s security. However, using strong passwords is often underestimated and ignored. Windows operating systems have complex password policies that, when activated, will warn you and force you to use complex passwords when you try to enter simple ones. While current password cracking programs can break passwords with sufficient time, guessing, and trial methods, breaking a simple password is not difficult at all. Breaking strong passwords is more difficult and time-consuming compared to breaking simple passwords. To enable password complexity, you can follow these steps on your own computer, or in a domain environment, create a new group policy to activate it. Start/Run/gpedit.msc From the screen that appears Computer Configuration/Windows Settings/Security Settings/Account Policies/ Enforce password history: This section sets how many previous passwords should be remembered. Here, you cannot reuse your last 3 passwords. Maximum password age: You can set how many days until your password expires from this field. For example, according to my settings, I need to change my password after 72 days Minimum password age: After changing my password, how many days must pass before I can change it again. In my example, 2 days must pass before I can change my password again Minimum password length: Specifies the minimum required password length. Password must meet complexity requirements: This activates the password complexity policy, which is the subject of our article. It prevents you from entering simple passwords to ensure your passwords are more secure. Store password using reversible encryption: This option helps store your passwords encrypted in a reversible way. What makes a weak password? Leaving the password blank Sticking your password to the monitor Contains your username, real name, or company name Contains a simple phrase like “Password” What should a strong password be like? At least 7 characters long Your password should not be stuck to the monitor Does not contain your username, real name, or company name Does not contain a simple phrase Each password should be different. For example: PassWord1, password2, Password3 – incrementing passwords like this is not considered strong. Group Example Uppercase characters A, B, C … etc. Lowercase characters a, b, c … etc. Numbers 0, 1, 2, 3, 4, 5, 6, 7, 8, 9 Symbols ` ~ ! @ # $ % ^ & * ( ) _ + – = { } | : ” ; ‘ < > ? , . / An example of a strong password: !(D@Vut> & <) Some passwords may appear strong but actually aren’t. While Merhaba2U! seems to meet all criteria, it’s easy to crack. Instead, using something like 5@na Merhq6@! would create a strong password. Additionally, using ASCII characters will help you create a strong password. (kUµ!¶0o and Wf©$0k#»g¤5ªrd.) It should be remembered that Windows allows passwords up to 127 characters in length. In Windows 98 and earlier versions, this limit is 14 characters. If you have Windows 98 in your environment, you won’t be able to log in with passwords longer than 14 characters. Hoping you create strong passwords Reference: http://technet.microsoft.com/en-us/library/cc756109%28v=ws.10%29.aspx
Password Policy Creation
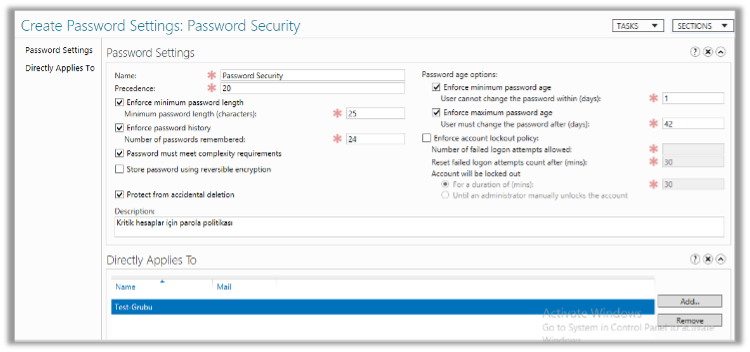
The security of critical accounts (such as service accounts) in organizations is important. It is recommended to gather these accounts under a security group and apply a specially created password policy for this group.To do this, open the Active Directory Administrative Center, select the domain from the left side, and navigate to System Password Settings Container. Then, make the definitions from New > Password Settings on the right side. The recommended settings are as follows. After configuring the settings, simply add the group in the Directly Applies To section. If you want to implement this policy for all users at the domain level, you can create a new GPO and assign it to users. Note: In a policy prepared through GPO, the minimum character count cannot exceed 14. If you want it to be more than 14 characters, this change needs to be made through the Administrative Center as in the first example. If you want to force users to change their passwords at their next login after applying this GPO, you can deploy it to the selected OU using the following command. Get-ADUser -Filter * -SearchBase “OU=OU NAME,DC=DOMAIN,DC=COM/LOCAL” | Set-ADUser -CannotChangePassword:$false -PasswordNeverExpires:$false -ChangePasswordAtLogon:$true When you enter this command, the “User must change password at next logon” checkbox will be checked for users who are members of the specified OU, and they will need to change their passwords at their next login attempt. Service account passwords (such as SQL Agent) are typically not changed after installation. This can be checked using the following PowerShell command: net user <service account name> /do Service account passwords that haven’t been changed for a long time can be cracked by an attacker. It is recommended to change these service account passwords every 6 months or annually.
Domain Controller Upgrade Steps
Although Domain Controller (DC) upgrade steps can stress some of us, there’s no need to panic. You can apply the following steps if there are multiple DCs in the environment. Don’t worry, everything will go smoothly. PRE-CHECKS BEFORE STARTING Has a new server been set up? Have the latest updates been applied to the new server? Has antivirus been installed? TASKS FOR THE OLD DC Has it been verified that DC replications are performed correctly? If there is a problem and there are other DCs in the environment, this step can be skipped. Have the server’s Name and IP, DNS, and if applicable, WINS information been noted down? Have the CPU, RAM, and HDD capacity information been noted down? Have the roles on the server been checked? Are the FSMO roles on the server at the highest level according to your setup, and have the roles on the current server been migrated to another server? If there is a DHCP role on the server, has a backup been taken? Has a file backup been taken on the server? Has an AD Backup been taken on the server? Has a snapshot or full backup been taken of the server? *If the server is a DC, has the DC role been removed? Has a different IP been assigned after the server restart? Has the ipconfig /registerdns command been executed by opening the command line? Has the new IP been checked on the DNS side in AD? Has the server been demoted from the domain and shut down? Has it been verified that the domain controller role of the old server has been removed in AD? Has replication been ensured on the other DCs? Is the information that the role has been removed the same on the other DCs? (same check as the previous step) ASSIGNING DC ROLE TO THE NEW SERVER Has the new server been given the name of the old DC? (The same name is not actually important, it’s only necessary if you have applications resolved by name; if not, a new name can be given) Has the primary DNS suffix been assigned to the server? Has the server been given the same IP, DNS, and if applicable, WINS information as the old DC? Has the server been restarted? Has the server been joined to the domain? Has the ipconfig /registerdns command been executed by opening the command line as run as admin? Has the IP information of this server been verified on the other AD and DNS server? Have the DC and DNS roles been added to the server? Has DHCP been installed and restored from backup? Has RDP been opened and remote connection permission granted? Has VMWare Tools been installed and the server restarted? Have the event logs been reviewed? If FSMO role distribution is necessary, has it been done? Has the installation been successfully completed? (If not completed, you can specify the steps where errors were encountered as a note below…) If the installation was successfully completed, give a high five 🙂 If there are checks you want to add to the article or find missing, you can help us improve by sending an email from the contact section.